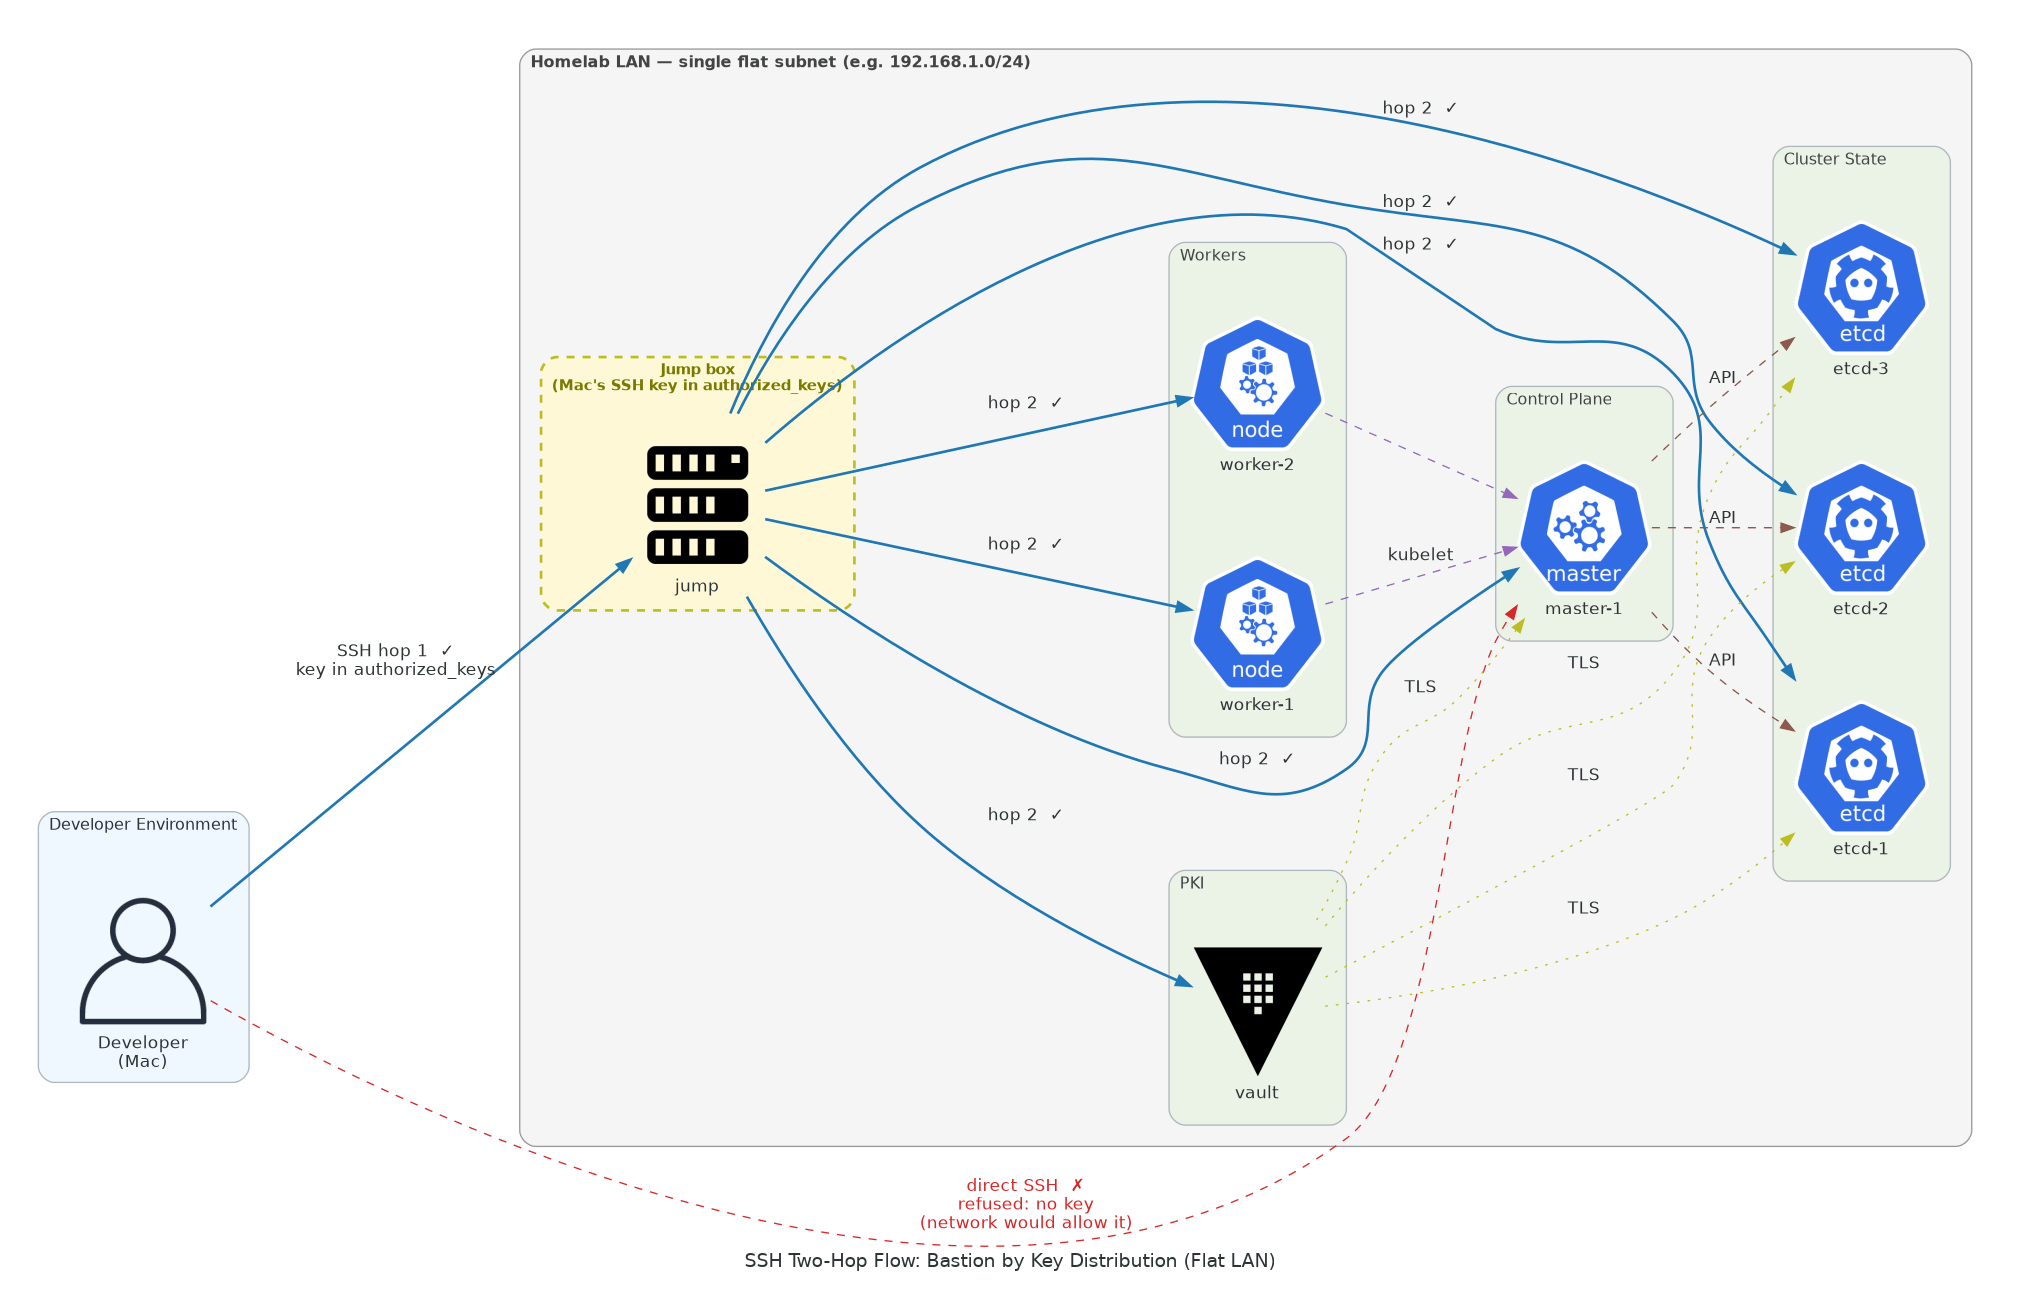
Every repo in this project — all six of them — includes a dedicated jump server. Whether you’re building the UTM Simple cluster with 6 VMs or the UTM HA cluster with 11, the Mac never connects directly to etcd nodes, masters, or workers. All access flows through a single entry point: the bastion server.
This isn’t an accident. It’s the bastion host pattern — a deliberate security architecture used in every serious production environment. This post explains why it exists, how the SSH configuration is structured across the homelab clusters, and why this matters beyond the homelab.
What a Bastion Server Is
A bastion host (also called a jump server, jump box, or jump host) is a single, hardened server that serves as the only externally accessible entry point to an internal network. Instead of exposing every server to the outside world, you expose one — and use it as a gateway to reach everything else.
The name comes from fortification architecture. A bastion is a projecting part of a fortress wall, designed to be the strongest point because it’s the most exposed. Same principle: the jump server faces the untrusted network (your Mac, or in production, the internet), so it gets the most attention for security hardening, logging, and access control.
In the homelab clusters, the jump server serves three roles simultaneously: bastion host (SSH gateway), Ansible controller (runs all deployment playbooks), and kubectl host (has the admin kubeconfig for cluster access). This consolidation makes sense for a learning environment. In production, these roles are often separated.
The SSH Flow: Mac → Jump → Cluster Node
When you want to check on an etcd node or debug a worker, the path is always two hops:
# Hop 1: Mac to jump serverssh jump# Hop 2: Jump server to target nodessh etcd-1
Your Mac only knows how to reach one server. The jump server knows how to reach all of them. This is enforced by design — the Mac’s ~/.ssh/config has a single entry, while jump’s SSH config has entries for every node in the cluster.
The connectivity test in the deploy scripts (Step 10 in the UTM HA deep dive) validates exactly this two-hop pattern. It tests Mac → jump first, then Mac → jump → each VM. If any link is broken, the test catches it before Ansible runs.
How the SSH Configs Are Structured
The bastion pattern requires SSH configuration at two levels: on the Mac (the external client) and on the jump server (the gateway).
On the Mac: ~/.ssh/config
Host jump HostName 192.168.64.12 User k8s IdentityFile ~/.ssh/k8slab.key StrictHostKeyChecking no UserKnownHostsFile /dev/null LogLevel ERROR PubkeyAuthentication yes
That’s it. One entry. The Mac doesn’t have SSH configs for etcd-1, master-1, worker-2, or any other node. If you tried ssh etcd-1 directly from the Mac, it would fail — your Mac doesn’t know what IP etcd-1 resolves to, and even if it did, the other nodes’ sshd would refuse the connection because your Mac’s key isn’t in their authorized_keys — though network-wise, the LAN route exists.
The StrictHostKeyChecking no and UserKnownHostsFile /dev/null flags look suspicious but are deliberate for ephemeral VMs. These clusters get destroyed and recreated regularly — each rebuild generates new SSH host keys. Without these flags, every rebuild would require manually clearing stale host keys from ~/.ssh/known_hosts. On a production bastion, you’d use proper host key verification.
On the jump server: ~/.ssh/config
Host vault HostName 192.168.64.11 User k8s IdentityFile ~/.ssh/k8slab.key StrictHostKeyChecking no UserKnownHostsFile /dev/nullHost haproxy HostName 192.168.64.10 User k8s IdentityFile ~/.ssh/k8slab.key StrictHostKeyChecking no UserKnownHostsFile /dev/nullHost etcd-1 HostName 192.168.64.21 User k8s IdentityFile ~/.ssh/k8slab.key StrictHostKeyChecking no UserKnownHostsFile /dev/nullHost etcd-2 HostName 192.168.64.22 # ... same pattern for all nodes
Jump’s SSH config has entries for every node in the cluster — 10 entries in the HA setup, 4 in the Simple setup. Each entry uses the same SSH key (k8slab.key, which was copied from the Mac to jump during setup) and the same k8s user.
This config is written by the deploy script during jump server setup (Step 9 in the UTM HA deep dive, and the equivalent step in the Vagrant and OrbStack projects). The script generates it dynamically from the VM definitions array, so the IPs always match the actual deployment.
Why Jump Also Runs Ansible and kubectl
In the homelab clusters, the jump server isn’t just an SSH gateway — it’s the command center. All Ansible playbooks execute from jump, and the admin kubeconfig for kubectl is deployed there.
This consolidation is deliberate:
Ansible needs SSH access to all nodes. Since jump already has SSH configs and keys for every node, it’s the natural place to run playbooks. The alternative — running Ansible from the Mac — would require the Mac to have direct SSH access to all 11 nodes, which breaks the bastion pattern entirely.
kubectl needs the admin kubeconfig. The kubeconfig contains the API server endpoint (HAProxy’s IP in HA clusters, master’s IP in Simple clusters) and the admin client certificate. Deploying it to jump keeps credentials off the Mac and ensures cluster management happens through the bastion.
Everything stays inside the cluster network. When Ansible runs ssh etcd-1 'sudo systemctl restart etcd', that traffic stays on the cluster’s internal network. When kubectl get pods talks to the API server, that traffic stays internal too. The Mac only sees the jump server’s SSH session.
The Pattern Across All 6 Repos
The bastion pattern is consistent across every project, but the networking details vary by tool:
UTM clusters (Simple, HA) use UTM’s shared networking on the 192.168.64.0/24 subnet. Each VM has a single NIC with one IP. Jump is at .12. The Mac’s /etc/hosts maps jump and vault to their IPs. Cleanest setup — one interface, one IP, no ambiguity about which address to use.
Vagrant clusters (Simple, HA) use socket_vmnet for bridged networking on a subnet auto-detected from the vmnet config (typically 192.168.105.0/24). Each VM has two NICs — eth0 (NAT, used by Vagrant for provisioning) and eth1 (vmnet, used for all cluster traffic). The bastion pattern is the same, but the SSH configs must reference eth1 IPs explicitly. Using the wrong interface is the #1 source of mysterious failures in Vagrant setups.
OrbStack clusters (Simple, HA) use OrbStack’s built-in networking on 198.192.139.0/24. Each machine has one interface with two IPs stacked on it — the OrbStack-assigned IP and the static IP configured by the deploy script. The bastion pattern is identical to UTM, just on a different subnet.
Despite these networking differences, the SSH flow is always the same: Mac → jump → target. The deploy scripts generate tool-specific SSH configs, but the architecture is invariant. This is covered in more detail in the Learning Path post, which maps the shared architecture across all three tools.
Why Not SSH Directly?
On a homelab, you could add all 11 VM IPs to your Mac’s SSH config and reach every node directly. It would work. Here’s why the project doesn’t do that:
Reduced attack surface. Only one server accepts SSH connections from outside the cluster network. If you wanted to add firewall rules, IP whitelisting, multi-factor authentication, or session recording, you’d only need to configure it in one place. Every internal node becomes unreachable without first passing through the bastion.
Simpler Mac configuration. Your ~/.ssh/config has one entry instead of 11. When you destroy and rebuild the cluster, you update one host key instead of 11. When you switch between different clusters (UTM, Vagrant, OrbStack), each one just needs its own jump entry.
Audit trail. In production, every SSH session through the bastion can be logged, recorded, and attributed to a specific user. You can’t audit what you can’t see, and direct connections bypass any centralized logging.
Key management. The SSH private key exists in exactly two places: the Mac and the jump server. The Mac uses it to reach jump. Jump uses it to reach all other nodes. No other node has the private key — they only have the public key in their authorized_keys. If you SSHed directly from the Mac to all nodes, you’d need the private key configured for all 11 connections, increasing the places where a key compromise matters.
Practice for production. This is arguably the most important reason. When you move to AWS, GCP, or Azure, your cluster nodes will be in private subnets with no public IPs. You’ll use a bastion host, or a cloud-native equivalent, to reach them. Building that muscle memory on the homelab means the production pattern feels natural rather than foreign.
Production Parallels
The homelab bastion pattern maps directly to production infrastructure patterns:

AWS. A bastion host (or jump box) sits in a public subnet with an Elastic IP. Kubernetes nodes live in private subnets with no public IPs. Security groups on the bastion allow SSH from specific IPs. Security groups on the private nodes allow SSH only from the bastion’s security group. AWS Systems Manager Session Manager is increasingly replacing traditional bastion hosts, but the principle is the same — a single audited entry point.
GCP. Identity-Aware Proxy (IAP) provides bastion-like access without running a dedicated VM. IAP tunnels TCP traffic through Google’s infrastructure, authenticating each session against IAM policies. The GKE nodes themselves have no external IPs.
Azure. Azure Bastion is a managed PaaS service that provides SSH/RDP access to VMs through the Azure portal or CLI. No public IPs on the target VMs, no bastion VM to manage — Azure runs the gateway infrastructure for you.
All three patterns share the same core idea as the homelab’s jump server: internal nodes are unreachable from the outside, and a single controlled gateway mediates all access. The homelab version is the simplest possible implementation — a VM with SSH configs — but the security architecture is identical.
The Bastion and etcd Security
The bastion pattern and etcd’s TLS configuration work together as defense in depth. Even if someone compromises the jump server’s SSH access, they still can’t read or write etcd data without valid client certificates. The etcd nodes require mutual TLS on every connection — server certs, peer certs, and client certs, all issued by Vault’s dedicated etcd CA. See Understanding etcd Quorum for the details of etcd’s TLS layers, and the Vault PKI deep dive for why the etcd CA is separate from the Kubernetes CA.
This layered approach means an attacker would need to: gain SSH access to the jump server, then SSH to an etcd node, then obtain valid etcd client certificates, and then use those certificates to authenticate to the etcd API. Each layer is an independent barrier.
Practical Commands for Your Homelab
Here are useful commands that exercise the bastion pattern on your homelab clusters:
Verify the two-hop connectivity:
# From your Mac — test hop 1ssh jump 'echo "Connected to jump"'# From your Mac — test hop 1 + hop 2 in one commandssh jump 'ssh etcd-1 "hostname"'ssh jump 'ssh master-1 "hostname"'ssh jump 'ssh worker-1 "hostname"'
Run kubectl through the bastion:
# Interactive sessionssh jumpkubectl get nodeskubectl get pods -A# One-liner from Macssh jump 'kubectl get nodes'
Check jump’s SSH config:
# See all the hosts jump knows aboutssh jump 'cat ~/.ssh/config'
Verify your Mac only knows about jump:
# This should show only the jump entry for the clustergrep -A7 'Host jump' ~/.ssh/config# This should fail — Mac doesn't know about etcd-1ssh etcd-1 'hostname' 2>&1 | head -1
Run an Ansible playbook through the bastion (how the deploy scripts work):
# The deploy scripts essentially do this:ssh jump 'cd ~/k8s-*-homelab/ansible && ansible-playbook -i inventory/hosts.yml playbooks/some-playbook.yml'
What the Bastion Doesn’t Protect Against
The bastion pattern has limits. It’s worth understanding what it doesn’t solve:
Compromised bastion = full access. If the jump server is compromised, the attacker has SSH access to every node (though they’d still need certificates for etcd and the API server). Production environments mitigate this with short-lived SSH certificates, session recording, multi-factor authentication, and intrusion detection on the bastion itself.
The bastion is a single point of failure for management. If the jump server goes down, you can’t SSH to any node, run Ansible, or use kubectl. The cluster keeps running (pods don’t need SSH to function), but you can’t manage it. Production environments run multiple bastion hosts behind a load balancer, or use managed services like AWS SSM that don’t depend on a single VM.
Internal traffic is uncontrolled. The bastion controls who enters the network, but once inside, a node can talk to any other node. Production environments add network policies (Kubernetes NetworkPolicy, VPC security groups, micro-segmentation) to restrict internal traffic. The homelab clusters use Calico for CNI, which supports NetworkPolicy — a good extension project once you’re comfortable with the base setup.
Key Takeaways
The bastion server pattern is one of the simplest security architectures to implement, and one of the most effective. It reduces your external attack surface to a single server, centralizes access control and auditing, and enforces the principle that internal infrastructure shouldn’t be directly reachable from untrusted networks.
In the homelab clusters, the jump server combines bastion, Ansible controller, and kubectl host into one VM. The Mac has one SSH config entry. Jump has configs for every node. All cluster management — from Ansible deployments to etcd quorum experiments to kubectl troubleshooting — flows through this single entry point.
This pattern is consistent across all six repos (UTM HA, Vagrant HA, OrbStack HA, and the three Simple clusters) and maps directly to how AWS, GCP, and Azure handle access to private infrastructure. Building the habit now means it’s second nature when you’re working with real production clusters.
Big tech, small lab. One reel at a time.
Questions, corrections, or want to share how you’re using these repos?
labitlearnit@gmail.com
Leave a Reply